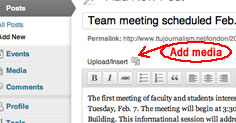
Adding photos (or video or audio files) to your post is as simple as clicking an icon, following directions, and filling out a form. In fact, you can add entire galleries of photos. You will be immediately confronted by a screen that gives you two methods for uploading images or other media files. If the image is on your desktop or some other convenient place, you can simply drag the image to the drag and drop area. As an alternative, you can click “Choose file” and browse to where the file is on your computer. When you have selected the file, click the “Choose” button, and the file uploading process will begin.
Once the file is uploaded, you will see an expanded window that contains several fields. Only a few things need to be attended to. You should take time to designate these specs for each picture you insert.
- ”Alt text” is a short description of your image that will be “seen” by Web site readers for the visually impaired. The reader will tell a blind person what the picture is, based on the alt text.
- “Caption,” as it sounds like, is text that is attached to and added below your image.
- “Size, Alignment” refers to how your image will be displayed. Typically you will have a few size options, and you can choose to align your picture right, left, centered, or with no alignment specified.
When you have completed the Alt Text field, the caption, and specified size and alignment, you click on “Insert into Post,” and your image does just that. This entire process describes single image insertion, and works just fine if you have only 1-3 images with your post. If, however, you want to insert a number of images, you should consider using the gallery insertion utilities.
Creating a Gallery
You can easily create photo gallery within a current WordPress site site. The post on Hampton Court Palace is a good example of a simple gallery.
Let’s say you have nine really good photos you want to include in a gallery. First, create your post according to the instructions above. Then upload each of your pictures, according to steps 1 and 2 above.
DO NOT do step 3 if you want to create a gallery. DO NOT click “Insert into Post.” Instead, just keep uploading pictures and clicking “Save all Changes” (not “Insert into Post”) at the end of each upload. When you have all your photos uploaded, you create the gallery much as though you were inserting a picture.
- Set your cursor where you want the gallery to appear (usually at the end of the post).
- Click on the “Add Media” icon.
- In the screen dialog that follows, click on the “Gallery” tab.
- Select the parameters you want.
- Click “Insert Gallery.”