This page is intended to offer just a few “quick start” tips for working comfortably in the WordPress environment. You must be logged in to create a post. If your site displays a link for logging in, usually it appears somewhere in the sidebar or at the very bottom of the page.
Note: All discussion here and all screen shots refer to the “Classic” WordPress interface, not the “Blocks” mode.
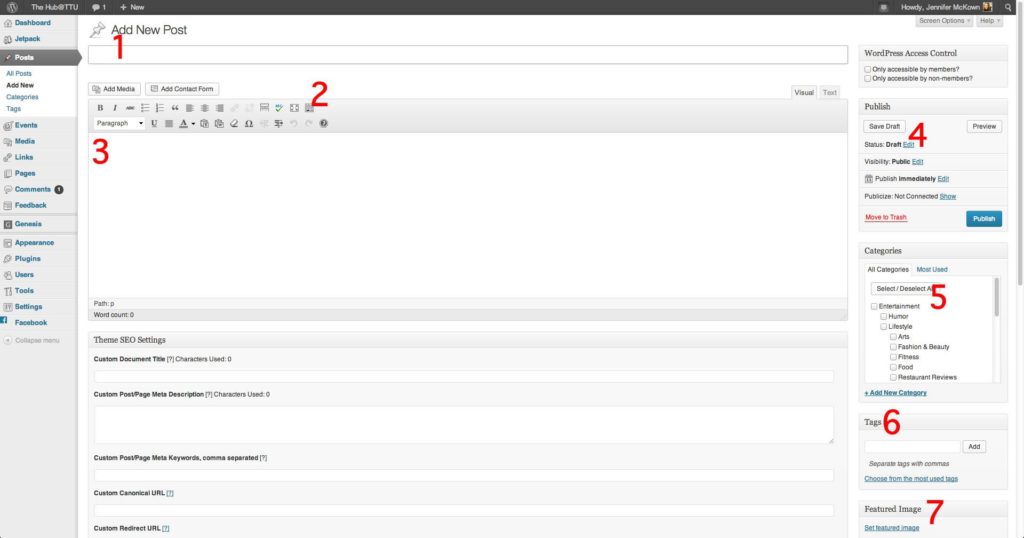
Once you are logged in, you can create a new post by selecting “Add New” under Posts. That brings up the dialog shown in Fig. 1. You use the main window for text, images, and other media. The rest of this page notes five things you must pay attention to any time you create a new post.

First, every post Begins with a headline (1). If your site has a “members only” feature and this is a private post, then you need to place a check in the “Only accessible by members” box. if you want it to be public, leave the box unchecked. While you are composing your message, you may want to click on the “Kitchen Sink” icon (2, also called “Toolbar toggle”), which opens a second line of message formatting tools. You compose your message in the visual composer text area (3). At any time you want to insert a message, you may click the “Add Media” button above the toolbar. Before you publish your post or even save it as a draft (4) you should select which category to file the story under (5). Generally, this should only be one category. See the document that differentiates between tags and categories. You may enter as many tags (keywords) as you like (6). For some themes, selecting (and placing) a “Featured Image” (7) may be critical to proper display.
After you have selected the category and are happy with what you have entered into the post, then clicking on “Publish” publishes your story in the Web site. Creating a page is done the same way, except that pages are not grouped into categories. Instead, they are organized into families of parents and children. Most user levels do not have sufficient privileges to create or edit pages.
For help in adding photos to your post, see the page on adding photos to your post.